#step 1 get the game installed and running correctly
Explore tagged Tumblr posts
Visit Tumblr Blog
Explore Tumblr blogs with no restrictions, modern design and the best experience.
Last Seen Tumblr Blogs


Fun Fact
Mobile US users spent an average of 115.8 minutes on Tumblr app monthly.
Text


Not a big fan of the OG Skyrim color grading but it is what it is. Not a bad looking game for it's age. (if you ignore my FPS outpaced the physics and caused tearing, stuttering, and my character to be unable to move followed by falling through the world. :) lol )
#skyrim#the elder scrolls#step 1 get the game installed and running correctly#Step 2 lock the FPS and decouple the physics engine from FPS#misadventures with aes#Step 3 begin installing mods in waves
4 notes
·
View notes
Text
How to Stream on Kick : A Complete Guide
In the dynamic world of online streaming, Kick.com is quickly becoming a popular choice for content creators. If you're looking to join this growing community, you've come to the right place. This guide will walk you through the process of registering and starting your first stream on Kick.com. Plus, we'll share a valuable tip on how to log your channel's messages using kickchatlogs.com.

Step 1: Registering on Kick.com
Create an Account
Visit Kick.com: Open your preferred web browser and navigate to Kick.com.
Sign Up: Click on the "Sign Up" button typically located at the top right corner of the homepage.
Fill in Your Details: Enter your email address, create a username, and set a strong password. You may also have the option to sign up using social media accounts like Google or Facebook for a quicker process.
Verify Your Email: Check your email for a verification message from Kick.com. Click on the link provided to verify your account.
Complete Your Profile
Login: Use your new credentials to log in to your Kick.com account.
Profile Setup: Go to your profile settings and fill in any additional information such as your profile picture, bio, and social media links. A well-completed profile can attract more viewers.
Step 2: Setting Up for Streaming
Download Streaming Software
To stream on Kick.com, you'll need reliable streaming software. Popular options include OBS Studio, Streamlabs, and XSplit.
Download and Install: Choose the software that suits you best and follow the installation instructions.
Configure Settings: Open the software and configure your stream settings. You'll need to set your resolution, bitrate, and other preferences.
Get Your Stream Key
Access Your Dashboard: Log in to Kick.com and navigate to your creator dashboard.
Find Your Stream Key: In your dashboard, locate the stream settings section where you'll find your unique stream key.
Copy the Stream Key: Copy the stream key as you will need to enter it into your streaming software.
Step 3: Going Live
Configure Your Streaming Software
Enter Stream Key: In your streaming software, go to the settings and find the "Stream" tab. Paste your Kick.com stream key into the designated field.
Set Up Scenes and Sources: Create scenes and add sources such as your webcam, game capture, and microphone.
Test Your Stream: It's always a good idea to do a test stream to ensure everything is working correctly.

Start Streaming
Go Live: Once everything is set up and tested, click the "Start Streaming" button in your streaming software.
Monitor Your Stream: Keep an eye on your stream through your Kick.com dashboard to ensure everything is running smoothly.
Bonus Tip: Logging Your Channel's Messages
As a streamer, it's important to keep track of your chat messages for community management and content moderation. The best place to log your channel's messages is kickchatlogs.com. This platform provides an easy and efficient way to save and review all your chat interactions.
Sign Up on Kickchatlogs.com: Create an account on kickchatlogs.com.
Link Your Kick.com Account: Follow the instructions to link your Kick.com channel to kickchatlogs.com.
Start Logging: Once linked, your chat messages will be automatically logged and can be accessed anytime through your kickchatlogs.com account.
Conclusion
Starting your streaming journey on Kick.com is straightforward and user-friendly. With this guide, you now know how to register, set up, and start streaming on the platform. Remember to use kickchatlogs.com to keep track of your channel's messages and maintain a healthy, engaged community. Happy streaming!
For more detailed guides and streaming tips, stay tuned to our blog. If you have any questions or need further assistance, feel free to leave a comment below.
#streaming#kick#kick.com#tutorial#how to stream on kick#start streaming#self employed#twitch#youtube#youtube live#twitch live#livestream#twitch stream#kick stream#livestreamer#asian andy
3 notes
·
View notes
Text
Google’s EC assist:Revolutionising Enhanced Conversions setup
In the ever-evolving world of digital marketing, staying on top of the latest tools and features can feel like a full-time job. On July 5, 2024, Google introduced a game-changing tool that’s set to make life easier for marketers everywhere: EC Assist. This Chrome extension is designed to simplify the often complex process of setting up Enhanced Conversions for Google Ads. Let’s dive into what this means for you and your marketing strategies.

1. What is EC Assist?
EC Assist is a Chrome extension developed by Google to help advertisers troubleshoot and optimize their Enhanced Conversions setup. Enhanced Conversions, for those who might be unfamiliar, allow advertisers to send hashed first-party conversion data to Google, powering tools like Smart Bidding for better ad performance. While crucial for optimizing Google Ads campaigns, setting up Enhanced Conversions correctly has been a challenge for many marketers – until now.
2. How EC Assist Works
The beauty of EC Assist lies in its simplicity. Here’s how it works:
1. Install the EC Assist Chrome extension
2. Run a test conversion on your website
3. EC Assist identifies potential issues and suggests next steps
This straightforward process takes the guesswork out of Enhanced Conversions setup, making it accessible to marketers of all skill levels.
3. Benefits for Marketers
The introduction of EC Assist brings several key benefits:
Time-saving: Reduces the time spent troubleshooting Enhanced Conversions setup
Accuracy: Helps ensure correct implementation, leading to more reliable data
Accessibility: Makes advanced features more approachable for less tech-savvy users
Improved performance: Correct setup of Enhanced Conversions can lead to better ad performance
4. Industry Reactions
The digital marketing community has shown mixed reactions to EC Assist. Scott Carruthers, Head of PPC, was among the first to spot and share the update on LinkedIn, generating significant buzz.
Some marketers have expressed relief at having a tool to simplify what they’ve found to be a complex process. Others, who haven’t struggled with Enhanced Conversions setup, see it as a nice-to-have rather than a necessity.
Interestingly, Boris Beceric and Rob P commented on X (formerly Twitter) that the complexity of Enhanced Conversions setup often depends on a website’s architecture. This insight highlights the varied experiences marketers have had with this feature.
5. The Bigger Picture: Google's Accessibility Push
EC Assist is part of a broader trend we’re seeing from Google: making advanced advertising features more accessible to a wider range of users. This move reflects an understanding that powerful tools should be available to all marketers, not just those with extensive technical knowledge.
6. How to Get Started with EC Assist
Ready to give EC Assist a try? Here’s how to get started: Open the Chrome Web Store
Search for “EC Assist”
Click “Add to Chrome” to install the extension
Once installed, navigate to your website
Run a test conversion
Review EC Assist’s findings and recommendations
Conclusion
Google’s EC Assist represents a significant step forward in making Enhanced Conversions more accessible and easier to implement correctly. By simplifying this process, Google is empowering marketers to leverage advanced features and potentially improve their ad performance. Whether you’re a seasoned pro or new to Google Ads, EC Assist is a tool worth exploring to ensure you’re getting the most out of your Enhanced Conversions setup.
7. FAQs
Q1: Is EC Assist free to use?
A1: Yes, EC Assist is a free Chrome extension provided by Google.
Q2: Do I need to be a Google Ads expert to use EC Assist?
A2: No, EC Assist is designed to be user-friendly and helpful for marketers of all skill levels.
Q3: Will EC Assist work with any website?
A3: While EC Assist should work with most websites, its effectiveness may vary depending on your site’s architecture.
Q4: Can EC Assist guarantee perfect Enhanced Conversions setup?
A4: While EC Assist can significantly help, it’s always important to double-check your setup and consult with Google’s documentation if needed.
Q5: How often should I use EC Assist?
A5: It’s a good idea to use EC Assist whenever you make changes to your conversion tracking or if you notice any issues with your Enhanced Conversions data.
This article is based on a news release dated July 5, 2024, and includes interpretations and industry reactions. While efforts have been made to ensure accuracy, readers are encouraged to verify information and consult official Google documentation for the most up-to-date details on EC Assist and Enhanced Conversions.
#seo services#branding#social media metrics#best digital marketing company#marketing metrics#social media#facebook ads#google ads#pay per click#search engine marketing#search engine optimization#ppc services
2 notes
·
View notes
Text
extremely long post below the cut, please read the entire thing b4 brashly doing anything. there's a lot and there is scaling difficulty with the steps you can take.
it's actually better for android users to debloat their phones than to just turn off settings — if done correctly, you're able to fully uninstall apps from your phone.
we already know that, after Facebook being put on trial in 2012 (settled in 2022 for a measely $90m out of their $590b) due to their tracking settings — even if off — are still running. even if you turn phone settings off, apps are able to "see" one another and collect data that way. including your keyboard. i repeat:
YOUR PRE-INSTALLED PHONE KEYBOARD IS A DATA COLLECTOR
the issue is that debloating your phone takes a little know-how, and you need a PC to do it. you cannot just "disable" apps from your phone, they're still functional at some capacity.
i REALLY recommend using UAD (Universal Android Debloater) if possible. which, again, requires a computer — i also recommend that you entirely stop using any and all Google services. i am talking down to: Learning How to Read A Map
no more google maps. yes, it's a total pain in the ass, but data collection is not a joke. gmail is a data collector, YouTube is a data collector any form of docs/sheets is a collector, and again:
i cannot fucking stress this enough.
YOUR PRE-INSTALLED KEYBOARD COLLECTS YOUR KEYSTROKE DATA.
IT. TRACKS. WHAT. YOU. ARE. TYPING.
this link has installation instructions for UAD — this is to debloat your phone, focusing on unnecessary Samsung and Google apps. the major 2 problems are: you will need a computer, and you will need to learn how to use GitHub thru YT tutorials.
learning how to use GitHub will be extremely important for protecting your PC as well from Windows bullshit
🗣️DO THIS FIFTH🗣️
a chart of what apps to uninstall and what they do:
(there are also some other ways to stop/uninstall apps on this post, but i don't know the details behind them and recommend you look into them yourself if you can't use UAD)
🗣️DO THIS FOURTH🗣️
for a Google Play Store replacement:
list of games available on fdroid:
🗣️DO THIS FIRST🗣️
for a non-tracking QWERTY, QWERTZ, AZERTY, Kurdish QWERTY, Russian, and more keyboard:
for a non-tracking Japanese 3x4 keyboard:
🗣️DO THIS SECOND🗣️
NewPipe is the YT alternative; this app prevents Google from collecting your IP and you no longer have 1) ads 2) to login 3) afk prompts to check if "you're still there".
🗣️DO THIS THIRD🗣️
USE FIREFOX AND TOR. set your default search engine to DuckDuckGo on FF
(there's actually discussion on whether or not firefox is completely trustworthy on mobile due to their code not being entirely opensource. something to do with working with google. the f-droid alternative is Fennec)
also please read a bit about how to properly use Tor; the tldr is to not login to anything — social media, emails, news sites — while using it
an endnote:
you do NOT have to do this all at once; i started out with swapping my keyboard and YT over first. i'd recommend at least doing your keyboard.
i just recently swapped to fdroid and installed Tor. i'm currently swapping out all of my gmail accounts for protonmail, tutamail, and mailfence.
i haven't even opened UAD yet, as i'm still in the process of finding app equivalents on fdroid and untangling myself from google services.
these will ALL take time getting used to — it sucks and the keyboards are absolutely not as efficient, but that's because there are no installed keyloggers. do not let laziness borne out of ease of use from proprietary apps and software prevent you from protecting yourself. i cannot stress this enough : do not be lazy about this.
r/privacy, r/cybersecurity, and privacyguides are great places to get started in understanding how to protect yourself online. i definitely recommend you start looking into how to do so on your PC as well, if you've got one
as for iOS users?
you're shit outta luck.


anyway yeah DELETE YOUR FUCKING ADVERTISING IDS
Android:
Settings ➡️ Google ➡️ all services ➡️ Ads ➡️ Delete advertising ID
(may differ slightly depending on android version and manufacturer firmware. you can't just search settings for "advertising ID" of course 🔪)
iOS:
Settings ➡️ privacy ➡️ tracking ➡️ toggle "allow apps to request to track" to OFF
and ALSO settings ➡️ privacy ➡️ Apple advertising ➡️ toggle "personalized ads" to OFF
more details about the process here via the EFF
#data privacy#online privacy#such a long post…#politics#? is it politics idk#iOS is entirely proprietary and closed source‚ that's why you're unable to do anything that android/samsung can do#i personally plan on getting a phone where i can swap the entire OS out but that'll be down the line
44K notes
·
View notes
Text
Bid management may seem easy at first glance: you set the price for a click and sit back watching money rolling in. However, given the impact click bids have on the advertising cost and effectiveness of your campaign, many begin to understand that smart bids management is one of the trickiest things in PPC advertising. So those, who will learn how to manage bids correctly, will be able to improve efficiency of their advertising campaigns and win the game. Bid Management Tricks To Effectively Run Advertising Campaigns The necessary condition for the correct bid management is conversion tracking set up in AdWords. To get the most efficiency, paste a Google Analytics tag on each page and set up goals for each desired action: purchase, lead, registration or everything else. The next step is to import these conversions from Analytics or install a separate conversion tracking code from AdWords. Either way, these measures will allow you to see the effectiveness of each campaign, ad group or keyword. PPC experts know that bids for keywords allow you to control your site position in SERP. However, you will not achieve results you want by increasing or decreasing maximum cost per bid only. Bids pared with quality score is what determines the place of your ad in the search results. Therefore, an equally important factor for an effective bids strategy is monitoring the keywords quality score. Google doesn’t reveal fully how it calculates the keywords quality score, however, we know several major factors that influence this process: Expected CTR of an Ad: historical CTR compared with competitor’s ads CTR influence this parameter. Ad/Search Relevance: is your ad text relevant to what the person searches for? From our experience, using automatically inserted keywords in the ad title leads to more clicks because of higher relevance of the ad. Landing Page Quality: if the keyword you promote is absent on the landing page, it will affect the quality score in a negative way. Page loading speed, unique content and user-experience are crucial and influence this parameter as well. This is why you should consider landing pages carefully. The higher your Quality Score is (10/10 at the best), the lower the bid you need to win the auction. 2 Key Approaches to Bid Management Approach #1. Manual Bid Management If you have just launched an advertising campaign, do not rush immediately to adjust bids. We recommend that you wait for at least 1-2 weeks to collect sufficient amount of clicks and conversions. When you have at least 200-500 clicks and some conversions, you have the data in your hands to make decision as to what keywords we can bid higher and which are not worthy that. The main idea of bid management is to reduce rates on ineffective words and to increase rates on the keywords that bring cheaper conversions. It’s very important to provide changes strictly on the keyword level, not on ad group level. Of course, it is easier to change the rates on ad group level — it's easier and faster. However, this method is not advisable. For example, one ad group has 10 keywords. Five of them are working perfectly and bring conversions with low acquisition cost, while other five perform very poorly. When you look at the ad group, you may decide that the whole ad group does not work effectively and turn it off completely, although you could reduce traffic for ineffective keywords only. An important note: we do not recommend turning off the keywords, because all keywords are useful if they are selected in accordance with the topic of your business. Even if they do not bring direct sales, they may have a significant contribution to the branding and associated conversions. So before you start adjusting the bids, you should divide the keywords into 4 segments, which then you will edit differently. 1st segment: keywords with conversions 2nd segment: keywords which required large investments, but did not drive any conversion 3rd segment: keywords that have lower position and don’t earn clicks
4th segment: keywords that have no impressions See the examples of each segment in the picture bellow: Start analyzing keywords with conversions, first. If the cost per conversion is less than we want, we increase the bid on this keyword. The adjustment will enable us to improve the position of an ad and attract more traffic. If the cost per conversion was higher than planned, we should lower the bid to reduce the number of inefficient traffic. In our example, desired cost per conversion is $60. That’s why we will increase bids for keywords [hair extensions] and [hair extensions online]. But we are going to lower bids for keywords +clip +in +hair +extension, because this one brings very expensive conversion. The word "clip in hair extensions" belongs to the 2nd segment. We spent on this word $84, but haven’t received any conversion. So we will reduce bids for this one and other words from the second group. The 3rd segment contains keywords that were shown on lower positions (3.5 and below) and didn’t bring any conversions. People don’t spot ads so much located down the list and therefore click on them quite rarely. So we raise the bids on these words in order to improve the average position and get the desired number of clicks. In the fourth group we have keywords that don’t have impressions. We can raise bids for such keyword to exclude the situation when the keywords are not shown because of the low bids. When we manage bids manually, we can raise or lower bid depending on how much the real cost of conversion differs from the desirable price. Typically, this is 10-50%. According to this proportion we should reduce cost per click from $2 to $1.5. Although such calculation is quite straightforward and isn’t always necessary for every word. If to being advertised for a particular keyword cost us $110, but did not bring any conversion (with the desired cost per conversion of $100), then we will reduce the bid slightly, by 10-15%. The main advantages of the manual method are full control of the situation, the ability to cancel any edits. However, this method is time-consuming to analyze and implement edits. So this method is not recommended for huge accounts. Approach #2. Automatic Bid Management To provide automatic edits, we have to set up certain rules for the each of our keyword segments. The system of Google AdWords will change the bids according to specified conditions and time intervals. To create a new rule, you need to select “Automate” on a campaign, ad group or keyword level and choose the right option from the list. The only problem is to make sure that your rules work properly. Check out how to create automated rules for certain segments. Goal #1: To increase bids if there is no conversions and low average position. Please note that this rule only applies to a certain search advertising campaign. With Google Display Network or brand name campaigns this rule can be not so effective. The same rule we can create for ads without conversions. Goal #2: To increase bids for keywords that bring low-cost conversions In this example we added the rule that the average position should be less than 1.5. If the keyword has higher position, this rule will not be so much effective. Goal #3: To increase bids for the keywords without impressions. This rule will increase bids by 15% for all the words that had no impressions during the analyzed period. In this case we put a cap on the maximum bid. So we raise the bids until the keyword does not begin generating traffic. After this it will automatically be placed under another rule. Wrap Up As we can see, there are some clear and doable bid management practices that can empower even small and medium businesses who do not have resources to hire PPC team. Increasing effectives of Google AdWords accounts is not that challenging if to approach it systematically. Note, that automatic rules are necessary for medium and large advertising accounts. However, do not create too many rules. Remember, that rules should save your time and money but not replace humans
What are your PPC management smart tips? Share your experience with us in the comments! About Author: Irina Nikulina is a PPC Specialist at Promodo. She has Marketing Master's Degree and over 3 years of experience in search engine marketing. Irina has managed advertising campaigns for large IT companies, and now she specializes in ecommerce PPC. Irina is continuously testing new tools and features and always ready to share her knowledge with others.
0 notes
Text
Where To Put Google Tag Manager Code In Google Site?
If you're running a website on Google Sites and want to streamline your tracking, marketing, and analytics setup, you've probably asked yourself: Where To Put Google Tag Manager Code In Google Site? Google Tag Manager (GTM) is a powerful tool that allows you to manage multiple tags such as Google Analytics, Facebook Pixel, or AdWords Conversion Tracking without editing your site's code repeatedly.
But here’s the kicker: Where To Put Google Tag Manager Code In Google Site isn't as intuitive as it might be on platforms like WordPress or custom HTML websites. In this blog, we’ll walk you through where to put Google Tag Manager code in Google Site, step by step, while also covering why it’s essential for modern digital tracking and campaign management.
What is Google Tag Manager?
Before we dive into where to put Google Tag Manager code in Google Site, let’s briefly explain what GTM is. Google Tag Manager is a free tag management system that allows you to quickly and easily update measurement codes and related code fragments collectively known as "tags" on your website or mobile app. Instead of manually inserting different code snippets, GTM gives you one consolidated snippet you can manage through a user-friendly interface.
Why Use Google Tag Manager in Google Sites?
You might wonder why you'd even bother figuring out where to put Google Tag Manager code in Google Site when you can insert individual tracking codes. Here are some reasons why GTM is a smarter choice:
Efficiency: GTM reduces manual effort by allowing centralized management of all tags.
Speed: Faster page loading due to asynchronous tag firing.
Testing: You can preview and debug tags before they go live.
Flexibility: Easily add, remove, or adjust tags without accessing the code every time.
Clearly, knowing where to put Google Tag Manager code in Google Site can be a real game-changer for your tracking setup.
Step-by-Step: Where To Put Google Tag Manager Code In Google Site?
Let’s now get to the core of the topic: Where To Put Google Tag Manager Code In Google Site. Follow these steps carefully:
Step 1: Create Your Google Tag Manager Account
Go to tagmanager.google.com.
Sign in with your Google account.
Click "Create Account."
Fill in your Account Name, Container Name (your website URL), and select "Web" as the target platform.
Click “Create” and accept the GTM Terms of Service.
Once your container is created, GTM will give you two code snippets:
One for the section.
One for the section.
Both are essential if you want GTM to function optimally.
Step 2: Access Your Google Site
Now that you’ve got your GTM code snippets, the next question is: Where To Put Google Tag Manager Code In Google Site?
Note: This method works for the new version of Google Sites (not Classic Google Sites).
Open your site in Google Sites.
Click the gear icon in the top-right corner and choose “Settings.”
From the left panel, select “Custom code.”
You'll see two sections:
Head
Body (end)
Step 3: Paste Your GTM Snippets
Copy the head snippet from GTM and paste it into the Head section of Google Sites.
Copy the body snippet and paste it into the Body (end) section.
Click “Save.”
That’s it! You’ve successfully figured out where to put Google Tag Manager code in Google Site.
Verifying the Installation
After adding your GTM code, it's crucial to ensure everything is working properly.
Go back to tagmanager.google.com.
Click on your container.
Click “Preview” and enter your site URL.
A new tab will open with your site in debug mode.
You’ll be able to see if your tags are firing correctly. This not only confirms that you’ve figured out where to put Google Tag Manager code in Google Site but also that it's working effectively.
Common Issues and Fixes
1. Tag Not Firing
If your tag isn’t firing, double-check that you placed both snippets in the correct fields: one in Head and one in Body (end). Misplacement is a common error when determining where to put Google Tag Manager code in Google Site.
2. Custom Code Disabled
Sometimes, the “Custom code” option may not appear. Ensure you're using the new Google Sites and not Classic Sites.
3. Conflicting Scripts
Too many conflicting scripts can slow your site or prevent GTM from working correctly. Always test after adding any new tag.
Alternatives to Google Tag Manager
If you're not ready for GTM, Google Sites allows some other basic analytics setups. But if you're serious about understanding user behavior, GTM is the gold standard.
Many businesses hire a Google Analytics consultant to properly set up GTM, as even a small mistake can skew your entire data setup.
B2B Applications: A Quick Look
If you run a business-to-business site, especially one built with Google Sites as a landing page or intranet, understanding where to put Google Tag Manager code in Google Site is vital. It allows your marketing and analytics teams to capture data effectively for lead generation, user engagement, and campaign performance.
Some companies even rely on a b2b web design agency to ensure that GTM and other performance tools are integrated properly within Google Sites and other platforms.
Final Thoughts
So, to wrap it all up where to put Google Tag Manager code in Google Site is not as complex as it seems. You simply add the GTM <head> code in the “Head” section and the <body> code in the “Body (end)” section within the Google Sites Settings menu.
Once installed, you unlock the door to better analytics, smarter tag management, and a more efficient workflow. Whether you're an individual blogger or managing a corporate landing page, understanding where to put Google Tag Manager code in Google Site is a key step toward optimizing your digital presence.
And remember: GTM is just the beginning. Make sure you regularly review your tag performance, A/B test your tags, and keep refining your tracking for the best results.
If you’ve ever asked where to put Google Tag Manager code in Google Site, now you know. So go ahead install it, test it, and start making smarter marketing decisions today.
0 notes
Text
iOS 18.5 Jailbreak – How to Install Cydia with iNstantJB
Apple just released iOS 18.5, and it comes with new features and security updates. But many iPhone users are still looking for more freedom. If you want to go beyond Apple’s limits, the iOS 18.5 Jailbreak is exactly what you need. Jailbreaking lets you install third-party apps, change the look of your iPhone, and use powerful tools that Apple doesn’t allow.

In this guide, we’ll explain what the iOS 18.5 Jailbreak is, how it works, and how to use iNstantJB to install Cydia on your device. We’ll keep it simple, clear, and to the point so anyone can follow along.
What is iOS 18.5 Jailbreak?
The iOS 18.5 Jailbreak is a way to unlock your iPhone or iPad so you can customize it the way you like. Apple puts many limits on what users can do, like stopping you from installing apps outside the App Store or changing the system look. Jailbreaking removes those limits.
When you jailbreak iOS 18.5, you can:
Install apps Apple doesn’t allow
Change the icons and theme of your device
Add new features to your phone
Use tools that aren’t in the App Store
Fully control your iPhone or iPad
Many iOS users jailbreak just to install Cydia, the most popular app store for jailbreak tweaks and tools.
Why Should You Jailbreak iOS 18.5?
Even with new updates, iOS still feels locked down. You can’t use custom launchers, can’t record calls, and can’t even change the layout much. The iOS 18.5 Jailbreak lets you take back control.
Here’s why people jailbreak their iPhones:
Install modified apps and games (like hacked versions)
Block ads across all apps
Record your screen or calls
Use system-level tweaks
Speed up your device or clean up junk files
Jailbreaking gives your iPhone superpowers. And it’s more popular now than ever with tools like iNstantJB making the process easy and safe.
Use iNstantJB to Jailbreak iOS 18.5
If you’re ready to jailbreak, the best tool right now is iNstantJB. It’s an easy-to-use jailbreak platform that runs in Safari. You don’t need a computer, cables, or complex steps. Anyone can use it.
iNstantJB uses a partial jailbreak method. This means it doesn’t fully unlock the system like old tools used to, but it gives you access to Cydia, tweaks, and customization without damaging your iPhone.
Benefits of iNstantJB:
Works on all iPhones running iOS 18.5
No need for a PC or Mac
Runs right from Safari
Safe and easy to use
Installs Cydia in minutes
If you're looking for a simple way to try the iOS 18.5 Jailbreak, iNstantJB is the best way to get started.
How to Install iOS 18.5 Jailbreak Using iNstantJB
Follow these steps to jailbreak your iPhone and install Cydia:
Step 1 – Open Safari on Your iPhone
You must use the Safari browser for iNstantJB to work correctly.
Step 2 – Visit the Official Jailbreak Page
Go to the following link: https://www.instantjb.com/cydia-ios-18-1-2-3-4-5-6-7-8-9-jailbreak.html
This is the only official site to get the iOS 18.5 Jailbreak with Cydia.
Step 3 – Tap “Start Jailbreak”
The tool will check your device and iOS version. If it’s compatible, it will begin the process.
Step 4 – Follow the Instructions
You might be asked to complete a quick verification or install a temporary profile. This protects the jailbreak tool from spam or abuse.
Step 5 – Install Cydia
Once the jailbreak is done, Cydia will be added to your home screen. You can now open it and start exploring tweaks, themes, and more.
That’s it. You’ve completed the iOS 18.5 Jailbreak using iNstantJB.
What is Cydia?
Cydia is the number one app store for jailbroken iPhones. It gives you access to apps and tools that you can’t find in the App Store. Most people jailbreak their phones just to use Cydia.
With Cydia, You Can:
Change system settings Apple blocks
Use custom icons and themes
Add extra buttons and gestures
Download modded apps and games
Use advanced tools for privacy and control
After installing Cydia through the iOS 18.5 Jailbreak, your iPhone becomes fully customizable.
Top Cydia Tweaks for iOS 18.5
Once you’re jailbroken, try these popular tweaks from Cydia:
SnowBoard – Customize icons, fonts, and the lock screen
Filza – A full file manager with system access
iCleaner Pro – Free up space and speed up your device
BatteryLife – Check battery health and usage stats
Cylinder – Add cool animations when swiping between pages
These tweaks can turn your iPhone into a device that truly reflects your style and needs.
Is Jailbreaking iOS 18.5 Safe?
Yes, using iNstantJB to jailbreak your iPhone is safe. It uses a partial jailbreak method, so it doesn’t change deep system files. This lowers the risk of problems like crashing or boot loops.
Why iNstantJB is Safe:
You don’t need to connect to a computer
It doesn’t wipe your data
You can remove the jailbreak at any time
No risk of losing your warranty (just reset your phone)
If you follow the instructions, the iOS 18.5 Jailbreak with iNstantJB is one of the safest ways to unlock more features on your iPhone.
Devices Supported by iOS 18.5 Jailbreak
The jailbreak works with all iPhones and iPads running iOS 18.5. Here’s a list of supported models:
iPhone 15, 15 Pro, 15 Plus, 15 Pro Max
iPhone 14, 14 Pro, 14 Plus, 14 Pro Max
iPhone 13 series
iPhone 12 series
iPhone 11 series
iPhone SE (2nd and 3rd Gen)
iPad models running iOS 18.5
If your device is running iOS 18.5, you’re good to go.
Can You Still Use Your iPhone Normally After Jailbreak?
Yes. After using the iOS 18.5 Jailbreak, you can use your iPhone just like before. All your regular apps, settings, and features still work.
You can:
Make calls and send texts
Use FaceTime and iMessage
Access the App Store
Use Apple Pay and Wallet
Sync with iCloud
The only difference is—you now have more power and control over your device.
What Happens If You Don’t Want the Jailbreak Anymore?
No problem. Since iNstantJB uses a partial jailbreak, you can remove Cydia and reset your phone anytime. Just follow these steps:
Open Settings
Go to General > Transfer or Reset iPhone
Tap Erase All Content and Settings
This will return your iPhone to factory settings with no trace of the jailbreak.
Final Thoughts
The iOS 18.5 Jailbreak gives you the chance to fully customize your iPhone. You’re no longer stuck with what Apple allows. With the help of iNstantJB, anyone can jailbreak their device in just a few minutes—no computer needed, no special skills required.
You can unlock Cydia, download powerful tweaks, and make your iPhone truly yours. Whether you want more features, better control, or just a new look, the iOS 18.5 Jailbreak is the answer.
Visit the link below to get started right now: https://www.instantjb.com/cydia-ios-18-1-2-3-4-5-6-7-8-9-jailbreak.html
Take back control of your iPhone with the iOS 18.5 Jailbreak and enjoy the power of Cydia with the easiest tool—iNstantJB.
0 notes
Text
Portfolio, Documentation and Pitch (Aryan Raj Adhikari)
App Build
I am now going to tackle the final stage of our project, the app build export. I do have a general idea of how we export our VR level as an apk app but I still am uncertain about its technicalities. As such, research is most warranted.
Unreal's official website has an entire webpage dedicated to exporting VR applications that proved to be a lot helpful and I used that guide to try and get my app exported.

Figure 1 (Meta Quest Unreal Engine documentation, (antinnit, 2024))
As per the documentation, you need to download a couple of software applications to make sure that you can export a clean build of your VR level. Those include Java SE Development Kit, Android Studio and Meta Quest Developer Hub.
The steps to download those and the directions for use is also included within the documentation.

Figure 2 (Downloading Android Studio, (antinnit, 2024))
I believe you can use these documentations to safely install versions of the software needed to export the apk build. However, some of the versions are dependent on each other so you do need to make sure that you install the correct software versions.

Figure 3 (Android Studio)
Inside Android Studio, you also need to install certain dependencies of certain versions. Like the documentation notes, installation of SDKs and NDKs is really crucial as you might run into export build errors later on.

Figure 4 (Unreal Android SDK options)
Inside the 'Platforms' option, you have to set the version of the Android SDK and the NDK you installed. It should exactly match the versions you installed inside Android Studio. In the same window, you can also set the directory where you want your VR apk to be exported.
Once you have set your export locations and your development kit versions, you can package the entire VR level project as an apk inside the 'Android' tab inside 'Platforms'.

Figure 5 (Android Platforms)
You will then be introduced to a window with a bunch of lines of codes being executed in real time. Do not be alarmed as this is a standard procedure and its just letting you know that the project is being exported in real time.

Figure 6 (Project being exported)
Once this is complete, you should have a build export in your chosen directory which includes the apk file for the VR project that can be imported inside Oculus Quest 2.
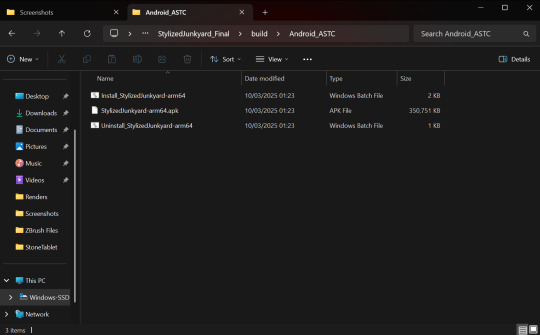
Figure 7 (Exported apk game build)
I am officially finished with the creation of the standalone VR apk project. I have named my game 'Junkyard Simulator' and now I will check whether the apk is stable and works correctly inside the Quest 2.
REFERENCES
antinnit, 2024. Unreal Engine Developer. [Online] Available at: https://dev.epicgames.com/community/learning/tutorials/3Vx6/unreal-engine-5-3-2-for-meta-quest-vr [Accessed 11 March 2025].
0 notes
Text
Week #9 - Final Critique
Introduction
This week I am going to lock in for the final critique. I would like to print better cards, as well as wrap the new box. If I have time, I also need to at some point make a stencil to spray the door designs on top of the tiles, but that doesn’t necessarily need to happen.
Research
I began by tweaking the content on the cards, now that I’ve come up with some of the playable roles in the game. I’m pretty much done with the cards, with some event cards being about taking and divvying up damage to the characters, and other event cards about removing tiles. The main issue I’m running into with these pre cut cards is that:
The material I originally bought is too wobbly
I was having trouble centering the cards correctly because after doing a test print in the FabLab the margins kept changing and the printer dialogue box doesn’t allow you to not shrink to fit inside of the margins for some reason
After enough trial and error, I’ve decided to try and do a double sided version where I glue both sides separately onto cardstock and then cut them out myself and use a corner rounder to make them like playing cards.

The next thing I did was design the wrap of my game more, adding some text to describe the game on the bottom of the box. Instead of regular printer paper, I went with a premium paper with a semi-gloss finish. The weight of the paper was 24lb and this slightly thicker weight made the final wrap of the box a lot cleaner. I also used double tack mounting film to glue the wrap onto the box, and this made it easier to get everything to stick evenly with no glue marks from using super glue like I did last time.

Here is the final construction. I really like how it looks, and the new paper I’m going to get will only elevate it further. I’m learning a lot about this which feels very similar to book binding, and so hopefully my next version will be my final. The only things I would tweak would be the actual size of the box, as I thought it was too tall and not wide enough slightly as I held it in my hands vs modelling it on my laptop screen. Everything technically fits in the box, but there could be more wiggle room inside with the pieces. I used 1/8th of an inch tolerance on the chipboard box, and it’s way easier to take on and off the box this time than my previous prototype. I think I could make the tolerance a LITTLE less but not too much.


For critique the last thing I did to get ready was print out the mockups of the space I had made in SketchUp, as well as what I want the board game insert to look like (which I haven’t attempted yet), and a photo of the table and benches I want to order on Amazon. On the topic of the board game insert, I really wanted to try using a vacuum forming machine, which is how they’re made professionally, but Stevens does not have one. I looked at which schools in the area had one and asked my friend from NYU if I could use the one in his MakerSpace. I unfortunately could not get there before the critique, but I have plans to go there on Thursday.
Reflections
One thing that I haven’t put a lot of work into is the instruction sheet, which is my next goal. I think that’s because it requires a lot of writing and checking with other people to see if they understand the gameplay. It’s not really something I can do on my own time, like I do with a lot of the other parts and aspects of my project thus far. And I can’t really get good feedback from the 2 ppl I’ve playtested with, since they’re too familiar with the game. I know I can just ask anyone, but it’s just something I’ve put off because I’ve chosen to do the other stuff first. Overall, though, I feel prepared for the critique, and I hope I get great feedback that will help me make my final steps in the upcoming 3 weeks before installation.
0 notes
Text
How to Add a Ceiling Fan to Your 3 Season Room?
A 3 season room is already a great way to enjoy the outdoors without dealing with bugs, extreme temperatures, or sudden downpours. But you know what makes it even better? A ceiling fan. Whether trying to keep things breezy in the summer or push warm air down in the fall, a ceiling fan can turn your 3 season room into a more comfortable, enjoyable space.
But before you grab a fan and start drilling into the ceiling, there are a few things you need to know. Let’s go step by step to install a ceiling fan that works for your space.
Can You Even Install a Ceiling Fan in a 3 Season Room?
Short answer: Yes, but it depends on your ceiling structure and the type of fan you choose.
Long answer: Many 3 season rooms don’t have traditional drywall ceilings, so you might need extra reinforcement to install a fan securely. Plus, standard ceiling fans aren't always rated for outdoor use. If you pick the wrong one, moisture and temperature changes can cause rust, warping, or electrical failures.
So, before you move forward, check these three things:
Ceiling Material – Is your ceiling made of wood, vinyl, or aluminum? Some materials need extra bracing.
Fan Rating – Make sure the fan is rated for “damp” or “wet” locations (more on this later).
Electricity Access – Is there a power source nearby, or will you need to run wiring?
If everything checks out, let’s move on.
Choosing the Right Ceiling Fan for Your 3 Season Room
Not all ceiling fans are created equal—especially in outdoor spaces. Here’s what to look for:
Damp-Rated vs. Wet-Rated Fans
Damp-rated fans – These work best for covered patios, sunrooms, and 3 season rooms that stay mostly dry but might be exposed to humidity.
Wet-rated fans – If your 3 season room has screens and is exposed to rain or heavy moisture, get a wet-rated fan. These are built to withstand the elements.
Fan Size Matters
A fan that’s too small won’t circulate enough air, and one that’s too big might overpower the space. Follow this rough sizing guide:
Small rooms (up to 144 sq. ft.) – 42-inch fan
Medium rooms (144–225 sq. ft.) – 48- to 52-inch fan
Large rooms (225+ sq. ft.) – 56-inch+ fan
Blade Material
Go for ABS plastic or composite blades—they handle humidity better than wood or metal.
Remote Control vs. Pull Chain
A remote control or wall switch is a game-changer if your ceiling is high or the fan will be hard to reach.
Installing Your Ceiling Fan
Now for the fun part—getting that fan up and running.
Step 1: Turn Off the Power
Safety first. Locate the circuit breaker and turn off the power to the area where you’ll work.
Step 2: Install a Fan-Rated Electrical Box
Ceiling fans are heavier than regular light fixtures, so you need a fan-rated electrical box to support the weight. If your 3 season room already has a light fixture, swap it out for a box that can handle at least 35 lbs.
Step 3: Secure the Mounting Bracket
Most fans come with a metal bracket that attaches to the electrical box. Make sure it’s level and firmly secured—this keeps your fan from wobbling.
Step 4: Assemble and Attach the Fan Blades
Follow the manufacturer’s instructions to attach the blades to the motor. Some fans let you do this before hanging, while others require blade installation after the fan is mounted.
Step 5: Wire It Up
Connect the black (hot) wire from the ceiling to the black (fan) wire.
Connect the white (neutral) wires.
Attach the green (ground) wire to the ground screw.
If your fan has a separate wire for lights, connect that to the blue or red wire in the ceiling.
Step 6: Secure the Fan and Test It
Once everything is wired correctly, secure the fan housing, restore power, and test it. You might need to balance the blades using a weight kit if the fan wobbles.
Smart Features & Extras Worth Considering
If you’re going through the trouble of installing a fan, why not add a few upgrades?
Smart Controls – Some fans connect to apps or smart home systems, letting you adjust settings from your phone.
Dimmable LED Lights – If your fan has a light, choose an energy-efficient LED option with adjustable brightness.
Reversible Blades – Many fans have a reverse function to push warm air down in cooler months.
Common Mistakes to Avoid
Skipping the fan-rated electrical box – A regular light fixture box won’t support the weight of a fan.
Using an indoor-rated fan – Even if your 3 season room is enclosed, moisture can still cause damage over time.
Choosing the wrong blade size – A too-small fan won’t move enough air, while a too-large fan might look out of place or hit obstacles.
Forgetting about airflow direction – In the summer, set your fan to spin counterclockwise to create a cooling breeze. In cooler months, switch it to clockwise to circulate warm air.
Final Thoughts
Absolutely. A ceiling fan makes your 3-season room more comfortable, extends its usability, and even adds value to your home. Plus, it’s a simple way to enhance airflow without cranking up the AC.
If you're in South Bend or nearby areas, Screenmobile of South Bend is here to help! We specialize in patio enclosures, screened-in porches, sunrooms, three-season rooms, and more—ensuring your space is functional, beautiful, and built to last.
1 note
·
View note
Text
5x10 Plasma Table Setup: Everything You Need to Know
Setting up a 5x10 plasma table can be a game-changer for your workshop, providing the precision and efficiency you need for cutting metals. Whether you're a hobbyist or running a professional shop, knowing how to properly set up your 5x10 plasma table is essential for getting the most out of this powerful tool.

What is a 5x10 Plasma Table?
A 5x10 plasma table is a CNC (computer numerical control) machine used for cutting metals with a plasma torch. The "5x10" refers to the dimensions of the cutting surface, with a 5-foot by 10-foot area that provides ample space for large projects. Plasma cutting is a fast, efficient, and precise method that uses ionized gas to cut through electrically conductive materials like steel, aluminum, and copper.
Step 1: Unpacking and Preparing Your Space
Before setting up your 5x10 plasma table, ensure you have adequate space. The table will require a flat surface and enough room around it for the plasma torch, material handling, and maintenance access. Make sure your space is free from any flammable materials and has proper ventilation for safe operation.
Clear the Area: Remove any obstacles or debris that could interfere with your setup.
Level the Surface: Ensure the table is level to avoid any cutting inaccuracies. Most tables come with adjustable legs or leveling feet for fine-tuning.
Power Supply: Check the power requirements of your 5x10 plasma table. It’s typically powered by 220V or 480V electricity, depending on the model.
Step 2: Assembling the Plasma Table
Once you have everything in place, you can begin assembling the plasma table. This process will vary depending on the manufacturer and model, but the general steps remain similar.
Frame Assembly: Begin by assembling the frame of the table. Use the provided tools and instructions to secure the pieces in place.
Crossbeams and Rails: Install the crossbeams and guide rails that will allow the torch to move across the cutting surface. Ensure they are aligned properly to avoid any misalignment during operation.
Torch Mounting: Attach the plasma torch to the gantry system. The torch should be mounted securely and aligned with the cutting area for optimal precision.
Step 3: Connecting the Electronics
The next step is to connect the electronics of the 5x10 plasma table. This includes the CNC controller, the plasma cutter, and the electrical components that will allow the system to work together seamlessly.
CNC Controller: The controller is the brain of the plasma table. Follow the manufacturer’s instructions to wire it to the system.
Plasma Cutter Integration: Connect the plasma cutter to the CNC system. Make sure the power supply and gas connections are secure and functioning properly.
Grounding: Proper grounding is critical for safety and performance. Make sure the system is grounded to prevent electrical interference and ensure safe operation.
Step 4: Software Setup
Most 5x10 plasma tables are controlled by specialized software that allows you to create and execute cutting designs. Install the software provided by the manufacturer or a compatible third-party program, such as SheetCam or Fusion 360.
Install the Software: Follow the installation instructions and ensure the software is properly configured to communicate with the CNC controller.
Set Parameters: Input the cutting parameters, such as material type, thickness, and cutting speed, to ensure the plasma table runs efficiently.
Step 5: Testing and Calibration
Once the physical and software setup is complete, it's time to test and calibrate your 5x10 plasma table. This step ensures everything is functioning correctly before you start cutting valuable materials.
Dry Run: Perform a dry run without cutting any material to verify that the gantry and torch are moving correctly.
Test Cut: After the dry run, perform a test cut on scrap material. This will help you fine-tune the settings, including torch height and speed.
Adjustments: Make any necessary adjustments based on the test cut to ensure smooth and precise operation.
Setting up a 5x10 plasma table is a multi-step process that requires careful attention to detail. By following these steps, you can ensure a smooth and efficient setup that will enable you to start cutting with precision. Once your table is up and running, you’ll be ready to tackle a wide variety of projects, from intricate designs to large industrial cuts.
0 notes
Text
How to Connect Power BI to MySQL Without Writing a Single Line of Code
Introduction
Power BI is an excellent tool for visualizing data, but getting that data from MySQL into Power BI can be a headache—especially if you’re not a database expert. Many people run into issues with ODBC drivers, authentication errors, or slow data refreshes.
What if you could skip all that and connect MySQL to Power BI effortlessly? That’s exactly what no-code SaaS integration tools like Konnectify help with.
In this guide, we’ll cover:
Traditional methods vs. no-code alternatives for connecting MySQL to Power BI
How to set up a seamless, automated MySQL-Power BI connection
Real-world examples of businesses that benefit from no-code integration
Let’s dive in. 🚀

Traditional Ways to Connect Power BI to MySQL (And Why They’re a Pain)
Before we talk about the easier, no-code method, let’s go over the traditional ways you might connect Power BI to MySQL:
1️⃣ ODBC Drivers & Power BI Connector
Microsoft provides an ODBC (Open Database Connectivity) driver for MySQL. In theory, this should allow Power BI to pull data from your MySQL database. But here’s what usually happens:
🔸 You install the MySQL ODBC driver (which can be a hassle). 🔸 You configure DSN (Data Source Name) settings, which requires technical knowledge. 🔸 Power BI might struggle with large datasets, leading to slow performance. 🔸 You have to manually refresh the connection to get updated data.
2️⃣ Direct Query Mode
Power BI has a DirectQuery mode, which allows live connections to MySQL databases. However:
⚠️ Query performance is often slow when dealing with large datasets. ⚠️ Permissions & security settings must be correctly configured. ⚠️ Data updates may be limited depending on your MySQL version.
3️⃣ Manual Data Exports & CSV Uploads
Many businesses simply export MySQL data as CSV files and manually upload them to Power BI. But this method is:
🚫 Time-consuming—you have to re-export data each time. 🚫 Prone to errors—outdated or incomplete data can lead to mistakes. 🚫 Not scalable—imagine doing this daily for multiple reports.
The No-Code Way: Using SaaS Integration to Connect Power BI & MySQL
A much simpler approach is to use a no-code integration platform like Konnectify. Instead of dealing with drivers, SQL queries, and data refresh headaches, you can automate the entire process in just a few clicks.
Here’s why this method is a game-changer:
✅ No coding required—anyone can set it up. ✅ Automated data sync—no manual exports or uploads. ✅ Faster performance—optimized connections prevent lag. ✅ Secure & reliable—ensures data integrity and security.
How to Set Up MySQL-Power BI Integration with Konnectify
Follow these simple steps to connect MySQL to Power BI without writing a single line of code:
Step 1: Sign Up on Konnectify
Head over to Konnectify and sign up for an account. It takes just a minute.
Step 2: Connect Your MySQL Database
🔹 Enter your MySQL database credentials. 🔹 Choose the tables and fields you want to sync. 🔹 Konnectify automatically configures the connection.
Step 3: Integrate with Power BI
🔹 Select Power BI as the destination for your data. 🔹 Choose how often you want your data to refresh. 🔹 Done! Your Power BI dashboards will now pull live data from MySQL.
🚀 Real-World Example: A Finance Team’s Data Challenge
A fast-growing SaaS company needed real-time financial data in Power BI. Their finance team was manually exporting MySQL reports every day, leading to delays and errors.
The Problem
Manual work—exporting CSVs, cleaning data, and uploading.
Slow updates—finance reports were always a day behind.
Human errors—misplaced files and incorrect data entries.
The Solution
They used SaaS integration via Konnectify to automate everything:
Connected MySQL to Power BI in minutes.
Set up automatic data refreshes every hour.
Built real-time dashboards to track revenue & expenses.
The Result
✅ 90% time saved—no more manual work. ✅ Instant updates—finance reports now refresh automatically. ✅ Better decision-making—leaders have up-to-date insights at all times.
🤔 Why Not Use Zapier or Other Automation Tools?
Zapier is great for basic automation but has limitations for complex data integrations like Power BI & MySQL. Here’s how Konnectify compares:

For real-time business intelligence dashboards, Konnectify is the better choice.
💡 Final Thoughts
If you’re still struggling with slow, manual Power BI-MySQL connections, it’s time to upgrade to a no-code solution. Whether running financial reports, analyzing customer data, or tracking inventory, automating your Power BI & MySQL integration will save you time, effort, and frustration.
🔹 Want to set it up now? Get started with Konnectify. 🔹 Need more guidance? Check out this step-by-step blog.
Let’s make data connectivity easy—no coding required. 🚀
#saas#saas platform#saas technology#saas development company#software development#software#information technology#b2b saas#ipaas#it services
0 notes
Text
Landscape Lighting Installation in Havertown, PA: Enhance Your Outdoor Space
Picture this: you're sitting in your backyard on a warm Havertown evening, the soft glow of lights illuminating your garden, walkways, and patio. Not only does it look stunning, but it also adds security, functionality, and value to your home. That's the magic of landscape lighting.
Landscape lighting installation is one of the most effective ways to elevate your outdoor space. If you're a Havertown homeowner looking to highlight your property's best features or make nighttime outdoor activities more enjoyable, this guide is for you.
We'll walk you through the benefits, explain how to plan your project and offer practical tips to get started.

Why Landscape Lighting is a Game Changer for Havertown Homes
Why invest in landscape lighting? It's more than just a touch of elegance for your backyard. Here are a few key reasons Havertown residents are turning to landscape lighting:
Enhanced Curb Appeal: Thoughtfully placed lights can transform your home's exterior, creating an inviting atmosphere that neighbors and guests will admire. Your property becomes a visual standout long after the sun sets.
Improved Safety and Security: Well-lit pathways and entries reduce the risk of trips and falls. Additionally, a lit property deters unwanted guests, giving your family greater peace of mind.
Extended Outdoor Usability: Hosting a late barbecue or enjoying quiet evenings on the patio? Landscape lighting allows you to fully enjoy your outdoor spaces, regardless of the time of day.
Boosted Home Value: A beautifully lit outdoor area can increase your property's overall market value, catching the eye of prospective buyers in the future.
Step-by-Step Guide to Landscape Lighting Installation
Installing outdoor lights may sound complicated, but here's a breakdown to help simplify the process:
Step 1. Choose Your Power Source
Decide between low-voltage, solar, or line-voltage lighting systems:
Low-voltage systems are energy-efficient and popular for residential projects.
Solar lights are eco-friendly and require no wiring but depend on sunlight for effectiveness.
Line-voltage systems offer brighter lighting and are commonly used in large yards but require professional installation.
Step 2. Gather Tools and Materials
For a low-voltage system, you'll need Light fixtures, a transformer, Outdoor cables, a shovel for burying wires, a timer, or an intelligent lighting system for automation.
Step 3. Start with the Transformer
Mount your transformer near an outdoor electrical outlet. This device will reduce your home's standard voltage to a safe level for outdoor use.
Step 4. Lay Out Cables
Run outdoor cables along the paths you want to light. Leave some slack in the wires to adjust fixture positioning as needed.
Step 5. Position the Fixtures
Place fixtures where desired and connect them to the cable. Secure pathway lights with stakes or mount decorative lighting as needed.
Step 6. Test and Adjust
Before burying wires, test your system. Ensure all lights are functioning and positioned correctly, and make adjustments as needed for optimal coverage.
Step 7. Bury the Wires
Once satisfied, bury the wiring about 6-8 inches underground to keep them out of sight and protected.

Choosing the Right Fixtures for the Havertown Climate
Havertown experiences all four seasons, so durability is a must. Keep these tips in mind:
Choose weatherproof materials such as stainless steel or brass to prevent rust and corrosion.
If installing solar fixtures, ensure they receive sufficient direct sunlight, even during shorter winter days.
Choose LED bulbs—they last longer, use less energy, and perform better in varying temperatures.
Maintenance Tips for Long-Lasting Lighting
To keep your landscape lighting looking and working its best, follow these easy tips:
Clean Fixtures Regularly: Dirt, debris, and weather can dull your fixtures over time. Wipe them down periodically to maintain their brightness.
Check Bulbs and Connections: Inspect and replace any burned-out bulbs or loose wiring to ensure consistent lighting throughout your yard.
Adjust Fixture Positions: Changes in landscaping or seasonal growth may require you to reposition fixtures for optimal effect.
Maintain Your Transformer: Check your transformer regularly to ensure it's free of debris or water ingress. Most models are weatherproof, but annual checks will go a long way.
How to Install Outdoor Landscape Lighting Like a Pro
You can handle many landscape lighting installation tasks if you feel confident. However, hiring a professional can ensure efficiency and safety if you're dealing with a large property or high-voltage system.
Companies serving Havertown specialize in customized lighting solutions for local homeowners, creating designs tailored to your unique property and needs.
Light Up Your Havertown Home Today
Installing landscape lighting can enhance your home's beauty, safety, and functionality. By planning carefully, selecting appropriate materials, and maintaining your system, you can enjoy the full benefits of outdoor lighting for many years.
If you're ready to transform your home's exterior, why not consult an expert? Our team specializes in creating personalized lighting solutions for Havertown homeowners. Contact us today and get one step closer to a brighter, more inviting home!
#landscape lighting installation#landscape lighting repair#landscape lighting repair near me#landscape lighting installers near me#landscape lighting services#landscape light installers near me
0 notes
Text
How to Maximize Your Viewing Experience: A Guide for TV Antenna Installation in Toowoomba

It was a Saturday afternoon in Toowoomba when Mark, a long-time local, sat down to watch the big game with his family. But, just as his team was about to score, the picture went fuzzy, and the sound cut out. Frustrated, Mark realized he was missing out on the perfect viewing experience due to poor signal quality. A visit from a professional for TV Antenna Installation Toowoomba made all the difference. Within hours, Mark was back to enjoying crisp, clear television, and his family could finally enjoy uninterrupted streaming.
If you find yourself frustrated with lagging signals, pixelated screens, or constant interruptions, don’t worry – you’re not alone. A solid TV antenna system can completely change how you experience TV in your home. Below, we’ll dive into the key steps to ensure that you maximize your viewing experience through the right Antenna Installation Toowoomba services, troubleshooting tips for Antenna Repair Toowoomba, and how to enhance your home entertainment setup.
1. Why Your Antenna Installation Matters More Than You Think
We often underestimate the importance of Antenna Installation Toowoomba because it’s easy to assume that all antennas perform equally. In reality, proper installation is crucial. If your antenna isn't correctly positioned or aligned, you’ll experience weaker signals, leading to poor reception.
According to the Australian Communications and Media Authority, nearly 10% of TV owners report issues with their antenna installation (ACMA, 2023). Whether it’s a misalignment or faulty wiring, poor antenna installation can result in signal interference, affecting your entire viewing experience.
Professionals specializing in TV Antenna Installation Toowoomba know exactly where to place and adjust your antenna for optimal reception, ensuring you get the best picture and sound quality possible.
2. Optimizing Your TV Antenna for the Best Signal
Not all TV antennas are created equal. You can choose between indoor and outdoor antennas, with outdoor ones generally offering better reception for most households. Antenna Toowoomba professionals recommend selecting an antenna that aligns with the type of signal you need and where you’re located. Toowoomba’s hilly terrain can create unique challenges, and outdoor antennas are often more effective in these conditions.
Additionally, modern TV antennas come with various features, such as signal boosters or smart TV compatibility, which can greatly improve your reception. If you’re unsure which option is best, reaching out to an Antenna Service Toowoomba provider for advice is always a good move.
3. Regular TV Antenna Repair Can Save You Money in the Long Run
Have you noticed that your signal drops more often than it should, or certain channels don’t come in at all? These could be signs that your antenna needs repair. Common issues include damaged cables, misaligned antennas, or corrosion from weather exposure.
In fact, TV antenna repair Toowoomba is more common than you might think. Around 12% of TV antenna systems in Australia experience some form of malfunction each year (Statista, 2022). Timely Antenna Repair Toowoomba services can prevent you from dealing with larger, more costly problems later on.
It’s important to get your antenna checked out by a professional if you notice any performance issues. Sometimes a simple Antenna Service Toowoomba visit is all it takes to restore your viewing experience.
4. Use Signal Boosters to Amplify Your Reception
If your TV signal is weak even after installing or repairing your antenna, you might need to boost it. Signal boosters are a great solution to improve reception in areas where the antenna struggles to pick up signals, such as in remote or suburban parts of Toowoomba.
Many antenna service professionals recommend installing a booster if you're experiencing constant signal drops, especially in the evenings when broadcast interference tends to increase.
5. Consider Upgrading to Digital TV Antennas
In Australia, many TV stations have switched to digital broadcasting, providing sharper, higher-quality signals. If your antenna is older and only supports analog signals, upgrading to a digital-compatible antenna can vastly improve your picture and sound quality.
A digital Antenna Toowoomba will allow you to access high-definition content and other advanced features like digital radio, which most older models can’t deliver. Plus, a TV Antenna Toowoomba that supports digital signals can help future-proof your TV setup for years to come.
Final Thoughts
Maximizing your TV viewing experience isn’t just about having a big screen; it’s about ensuring your signal is clear and consistent. From Antenna Installation Toowoomba to regular Antenna Repair Toowoomba services, every step plays a role in enhancing your entertainment. Don’t settle for less – invest in a quality antenna system, and you’ll be rewarded with crystal-clear broadcasts that make every show and game enjoyable.
By seeking expert help, understanding your antenna’s capabilities, and maintaining your equipment, you’ll be able to enjoy an optimized TV experience every time you tune in.
#tv antenna#tv antenna installation toowoomba#tv antenna toowoomba#antenna installation toowoomba#tv antenna installer#tv antenna installer toowoomba#tv antenna repair toowoomba#antenna repair toowoomba
1 note
·
View note
Text
How to Examine a Refurbished Laptop's Quality Before Purchasing

A refurbished laptop can be a cost-effective and eco-friendly choice, but ensuring its quality before purchase is essential. Whether you’re considering a Refurbished MacBook Air, a Windows laptop, or any other model, taking the right steps can help you avoid post-purchase issues.
This guide walks you through how to thoroughly evaluate a refurbished laptop so you can confidently make your purchase. Platforms like Retechie, specializing in refurbished laptops in India, are excellent sources, but you should still perform your checks to ensure a great deal.
Why Choose a Refurbished Laptop?
Refurbished laptops are pre-owned devices professionally restored to meet high-quality standards. They’re a great alternative to new laptops because:
Cost Savings: Get high-end features at a fraction of the cost.
Eco-Friendly Option: Reduce e-waste by reusing quality devices.
Certified Quality: Professionally refurbished laptops often include warranties, unlike used laptops or second hand laptops.
Steps to Check the Quality of a Refurbished Laptop
1. Buy from Trusted Sellers
Always buy from trustworthy websites such as Retechie, which specialize in reconditioned laptops in India. Trusted sellers provide professionally restored laptops, detailed product descriptions, and warranties for peace of mind.
2. Inspect the Exterior
The physical condition of a refurbished laptop can reveal much about its history and care.
What to Check:
Body: Look for scratches, dents, or cracks on the casing.
Screen: Inspect for dead pixels, discoloration, or cracks.
Keyboard and Trackpad: Make sure the trackpad functions properly and the keys are responsive.
Ports: Verify that all USB, HDMI, and other ports function correctly.
3. Verify the Specifications
Cross-check the laptop’s specifications against your needs to ensure it can handle your tasks efficiently.
Key Specs to Confirm:
Processor: Intel Core i5 or higher for multitasking.
RAM: For smooth operation, 8GB or more is needed.
Storage: SSDs are faster and more trustworthy than HDDs.
Graphics Card: Check if you need dedicated graphics for gaming or design work.
4. Test the Battery Life
Battery health is critical for portable use.
How to Test:
Fully charge the laptop and monitor how long it lasts during regular use.
Use built-in tools like Windows Battery Report or macOS System Report for detailed battery health information.
5. Check the Performance
Performance tests ensure the laptop runs smoothly and meets your expectations.
Tasks to Perform:
Open multiple tabs and run applications simultaneously to test multitasking.
Check boot-up and shutdown speeds.
Play a video or run a game to evaluate graphics performance.
6. Inspect Software and Updates
A refurbished laptop should have a fresh operating system installed and updated.
Things to Check:
Verify the OS version (e.g., Windows 10/11 or macOS).
Ensure all drivers are updated.
Confirm there’s no unnecessary or suspicious software installed.
7. Ask About Warranty and Return Policy
Most reputable sellers, including Retechie, provide warranties and return options for refurbished laptops.
Key Questions to Ask:
How long is the warranty valid?
What does the warranty cover?
Is there a return policy if the laptop doesn’t meet expectations?
8. Test the Connectivity
Ensure the laptop’s Wi-Fi, Bluetooth, and other connectivity features are functioning properly.
How to Test:
Connect to a Wi-Fi network and perform a speed test.
Pair a Bluetooth device to check compatibility.
Test external displays using HDMI or other ports.
9. Run Diagnostics
Use built-in diagnostic tools or third-party software to assess the laptop’s health.
Suggested Tools:
Windows Memory Diagnostic: Tests for RAM issues.
Apple Diagnostics: Checks hardware for MacBooks.
Third-Party Tools: Software like HWMonitor can provide insights into hardware performance.
10. Review the Laptop’s History
Ask the seller for details about the laptop’s refurbishment process and history.
Questions to Ask:
Was the laptop returned due to a defect or overstock?
Were any components replaced or upgraded?
Has the laptop undergone professional cleaning and testing?
Why Retechie is a Trusted Platform for Refurbished Laptops
Retechie specializes in high-quality refurbished laptops, offering a range of devices from brands like Apple, Dell, and HP.
What Sets Retechie Apart?
Certified Refurbishment: Every laptop is put through a thorough testing and repair process.
Warranty Protection: All products come with warranties for added confidence.
Wide Range: From Refurbished Apple Laptops to affordable Windows models, there’s something for everyone.
Sustainability Focus: Supports eco-friendly practices by reducing electronic waste.
Final Thoughts
Buying a refurbished laptop can be a smart and sustainable choice, but evaluating the quality is essential to ensure a worthwhile investment. By following the steps outlined in this guide, you can confidently purchase a laptop that meets your needs.
For reliable, professionally refurbished laptops, Retechie is your go-to platform. With their extensive selection and warranty-backed products, you can enjoy premium performance at an affordable price. Find your perfect refurbished laptop today at Retechie and experience the ideal blend of quality, value, and sustainability.
#Refurbished laptop near me#refurbished laptop#refurbished laptops#Used laptop#Used laptops in India#Refurbished apple#Refurbished Apple Laptops#Refurbished macbook air#renewed laptops#refurbished laptops in India#Old laptop#Second hand laptops#Second hand laptop#refurbished laptop in India#Retechie
0 notes
Text
How to Find Reliable Projector Rental Services in Kolkata
Finding a dependable Projector on rent in Kolkata can be a game-changer for businesses, educators, or individuals planning events. With the growing demand for high-quality visual equipment, ensuring you select the right rental service is crucial. Below is a detailed guide to help you make an informed decision while considering all necessary factors.
1. Understand Your Requirements
The first step in locating a reliable service is to define your needs clearly. Are you organizing a corporate presentation, a classroom seminar, or a wedding event? The type of projector, its resolution, brightness (measured in lumens), and compatibility with other devices should align with your specific purpose. Rental providers often offer a wide range of options, so knowing your requirements beforehand saves time and ensures a better experience.
2. Research Rental Providers
Kolkata boasts numerous vendors offering Projector on rent in Kolkata, but not all services are created equal. Conduct comprehensive research by exploring online reviews, asking for recommendations from peers, and visiting rental websites. Look for providers with positive testimonials, a wide inventory of products, and a reputation for professionalism.
3. Check Equipment Quality and Features
The condition and features of the projector play a pivotal role in the quality of the visuals. When reaching out to vendors, inquire about the latest models and whether they offer projectors with advanced features such as 4K resolution, HDMI ports, or wireless connectivity. Inspecting the equipment in person, if possible, ensures you’re getting value for your money.
4. Compare Pricing
Cost is a significant factor when choosing a Projector on rent in Kolkata. Compare quotes from multiple vendors to understand the average pricing. While affordability is important, beware of services offering rates that seem too good to be true, as they may compromise on quality or reliability. Opt for a provider that balances competitive pricing with excellent service.
5. Evaluate Customer Support
Reliable customer support is a hallmark of a trustworthy rental service. Whether you’re encountering setup difficulties or technical issues during use, a responsive team can save your event from disruptions. Look for vendors who provide round-the-clock assistance, on-site setup, and prompt solutions to queries.
6. Confirm Delivery and Setup Services
Transporting and setting up a projector can be challenging without technical expertise. Many rental providers offer delivery and setup services, ensuring the projector is installed correctly and ready to use. Confirming these services in advance is particularly beneficial for large-scale events or venues with complex technical requirements.
7. Read the Rental Agreement Carefully
Before finalizing your rental, review the terms and conditions in the agreement. Pay attention to details such as deposit requirements, return policies, and liability for damages. A transparent agreement reflects the professionalism of the rental provider and prevents misunderstandings.
8. Opt for a Trial Run
If you’re renting a projector for a critical event, consider requesting a trial run. Testing the projector allows you to identify potential issues, ensure compatibility with your devices, and confirm the equipment meets your expectations. Many vendors are willing to accommodate such requests to ensure customer satisfaction.
9. Assess Flexibility in Rental Terms
Flexibility is a key aspect to consider when choosing a Projector on rent in Kolkata. Some providers offer hourly, daily, or even weekly rental packages to cater to different requirements. Choose a vendor that aligns with your timeline and offers extensions if needed.
10. Verify References and Past Clients
To further ensure reliability, ask the vendor for references or examples of past clients they have served. A reputable provider will have experience catering to corporate events, educational institutions, and personal gatherings, which speaks volumes about their reliability and expertise.
Conclusion
Securing a reliable Projector on rent in Kolkata involves meticulous research and careful consideration of your specific requirements. By following the steps outlined above, you can ensure a smooth rental experience, superior equipment, and a memorable event. Always prioritize quality, transparency, and excellent customer support when selecting your rental service provider.
Whether it’s for business, education, or entertainment, finding the right projector rental service in Kolkata can significantly enhance your event’s success.
0 notes